
Reefkeeping: DIY aquarium stand
I designed and built an aquarium stand this past week as my first foray into woodworking, and it turned out well. I used about $60 in wood and other materials. I’m now thinking about what else I should build!
Searching
I settled on a 36 by 15 by 15 inch acrylic aquarium from Windrider Creations and planned to put most of the filters and equipment in a separate 20 gallon tank known as a sump, or since I will put creatures in it, a refugium.
The aquarium stand selection on Amazon was limited. I also looked for any sort of table with a lower shelf. Wood ones I found did not seem strong enough, and metal ones were very expensive.
I looked at some homemade stands on Google Images and decided it wouldn’t be too hard to make one myself.
Designing
I made some sketches on paper and settled on a design, but then wanted to make the lower shelf deeper and got frustrated with my paper plan. I searched for “3d wood program” and found something promising, SketchUp. It wasn’t immediately obvious how to manipulate shapes I made since individual lines were getting all screwed up, so I weighed reading the instructions or going back to paper, trying not to get involved in a huge new process.
I found a video series for woodworking specifically and watched the first two videos, on double speed since they are hosted on YouTube. That was enough for my needs.
I spent a couple of hours playing around and then making some table ideas. I tried using only 2x4s so I would be able to cut the wood somewhat easily in the apartment.
First draft of aquarium stand with shelves, designed in SketchUp
After calculating the table would weigh almost 100 pounds, I explored using 1x4s for the lower shelves and the top. I found an online sag calculator that helped me determine the shelves would be strong enough for the 200 to 300 pounds I expected to put on them. I was pretty sure the top surface would hold the 400 pound tank, but I did a few checks on that as well.
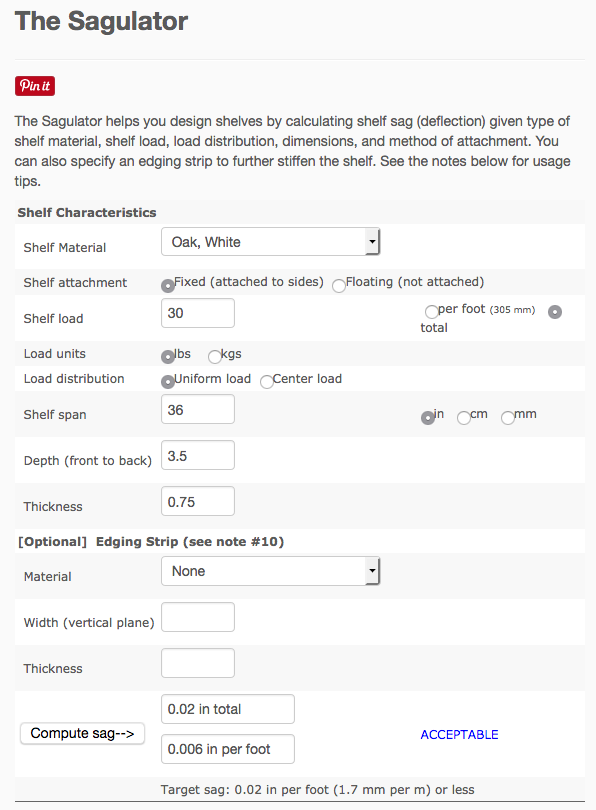
Calculating sag to decide how thick the wood should be for the shelves
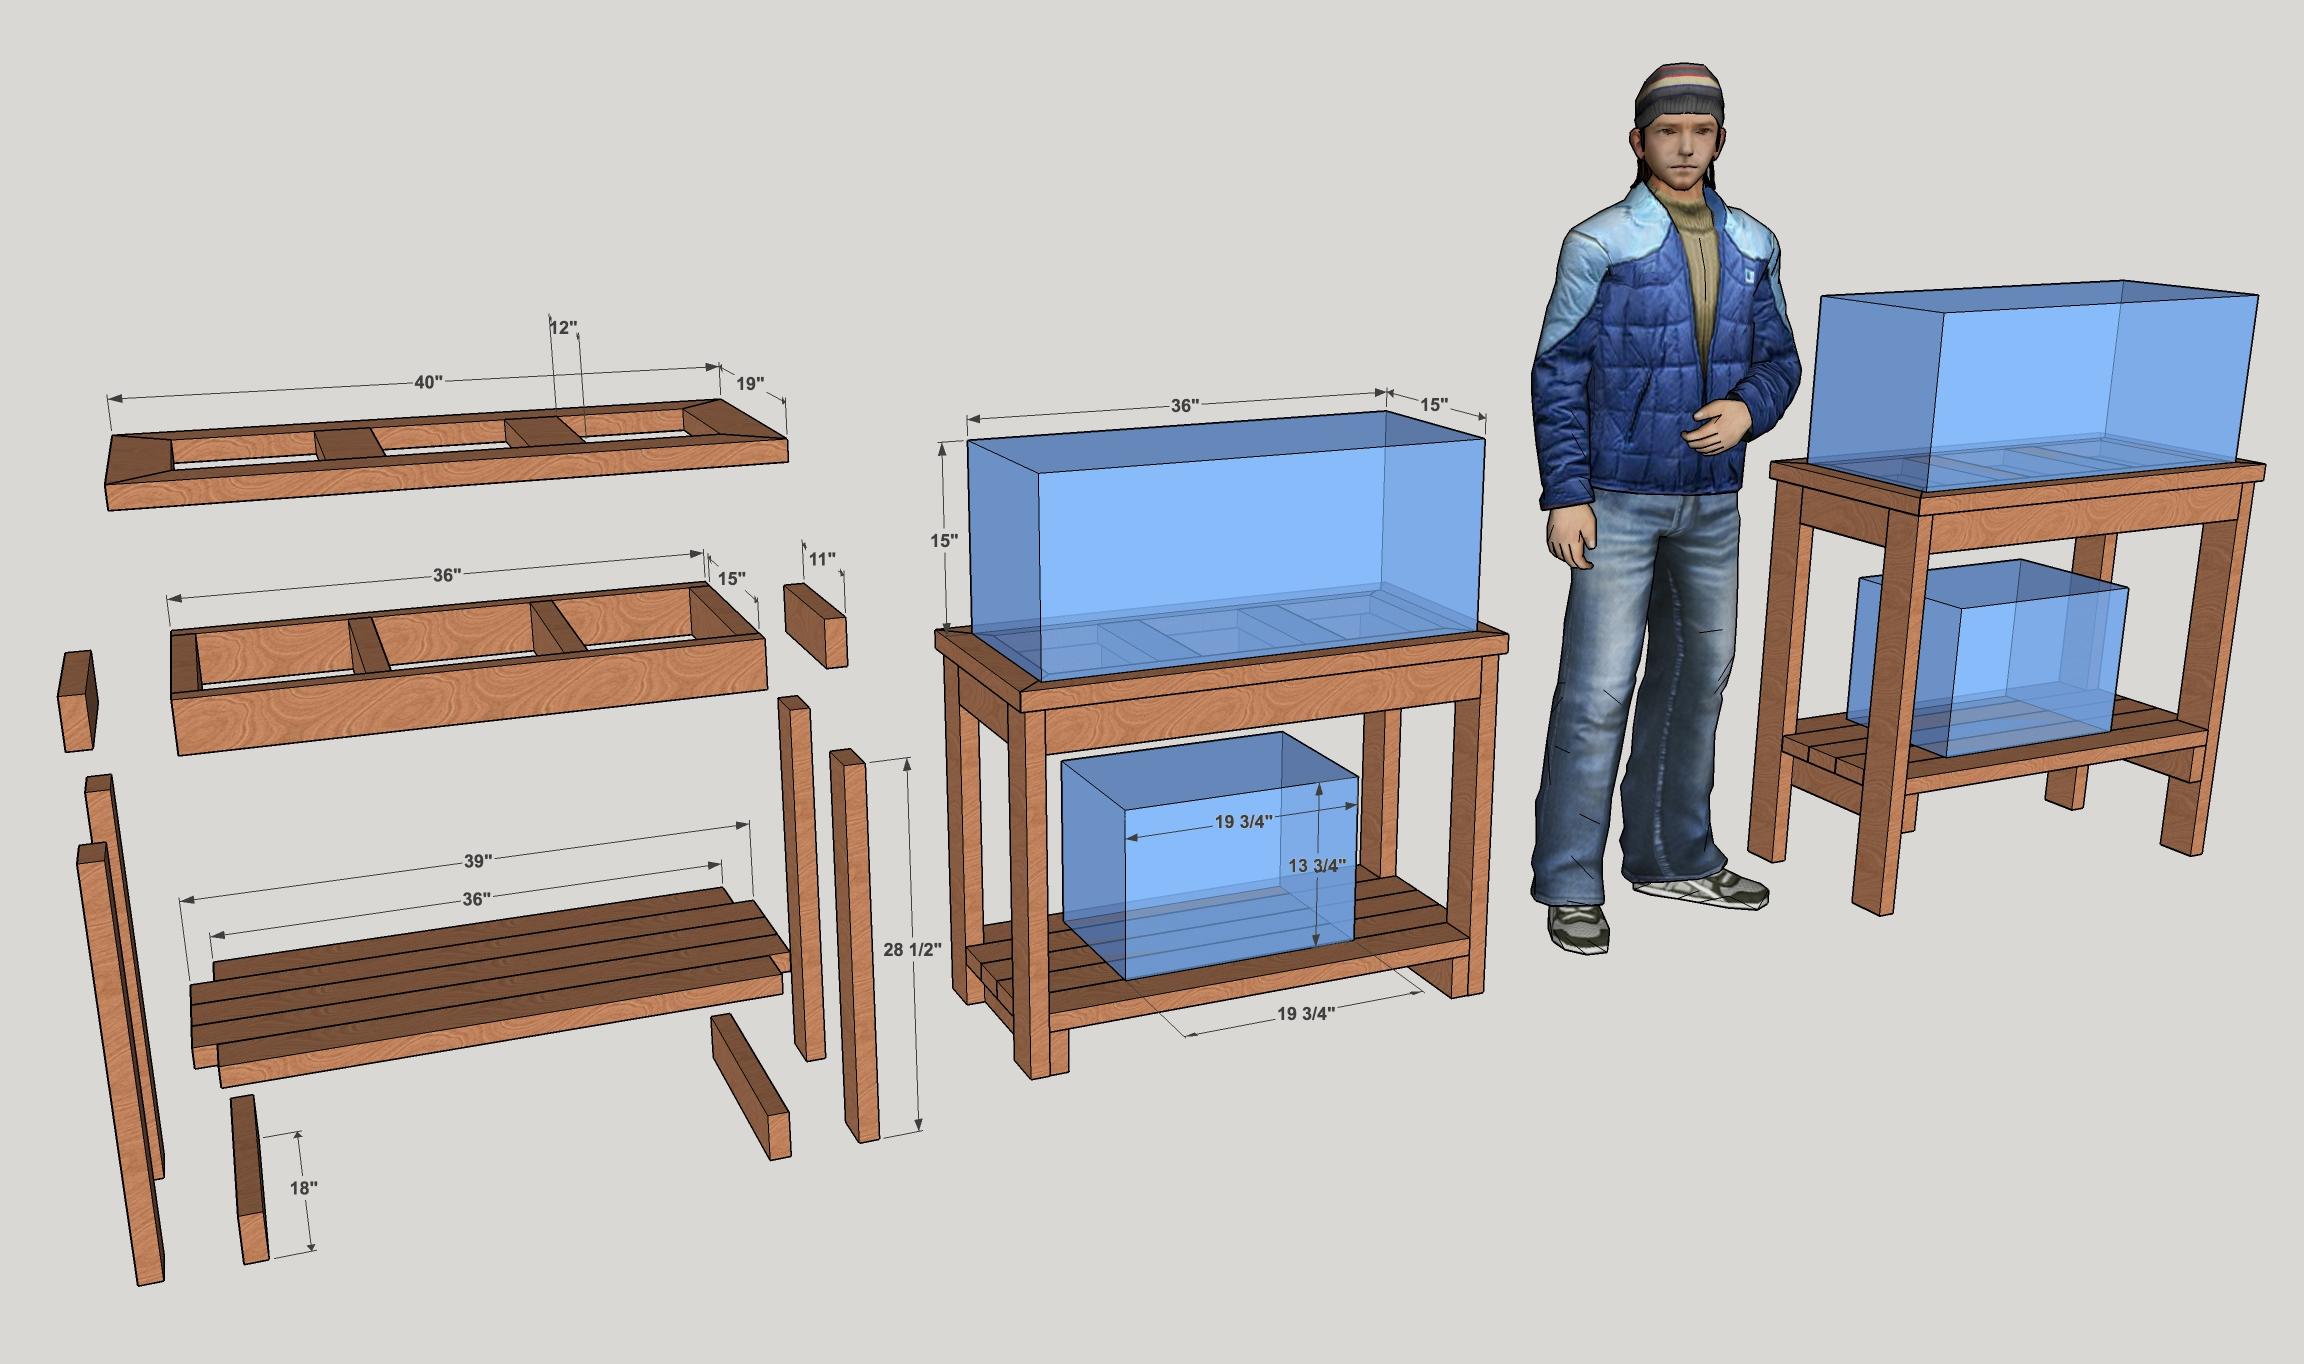
My final design was 36.75 inches tall with a 40 by 19 inch top surface extending a half inch beyond the frame and with two cross supports. The top surface could have been a solid board, but I both liked the look of gaps and do not have a good way to saw larger boards. I included two shelves and opted to make them adjustable with thick, half inch pegs.
I created a few views of the piece exploded, with dimensions and showing the tanks.
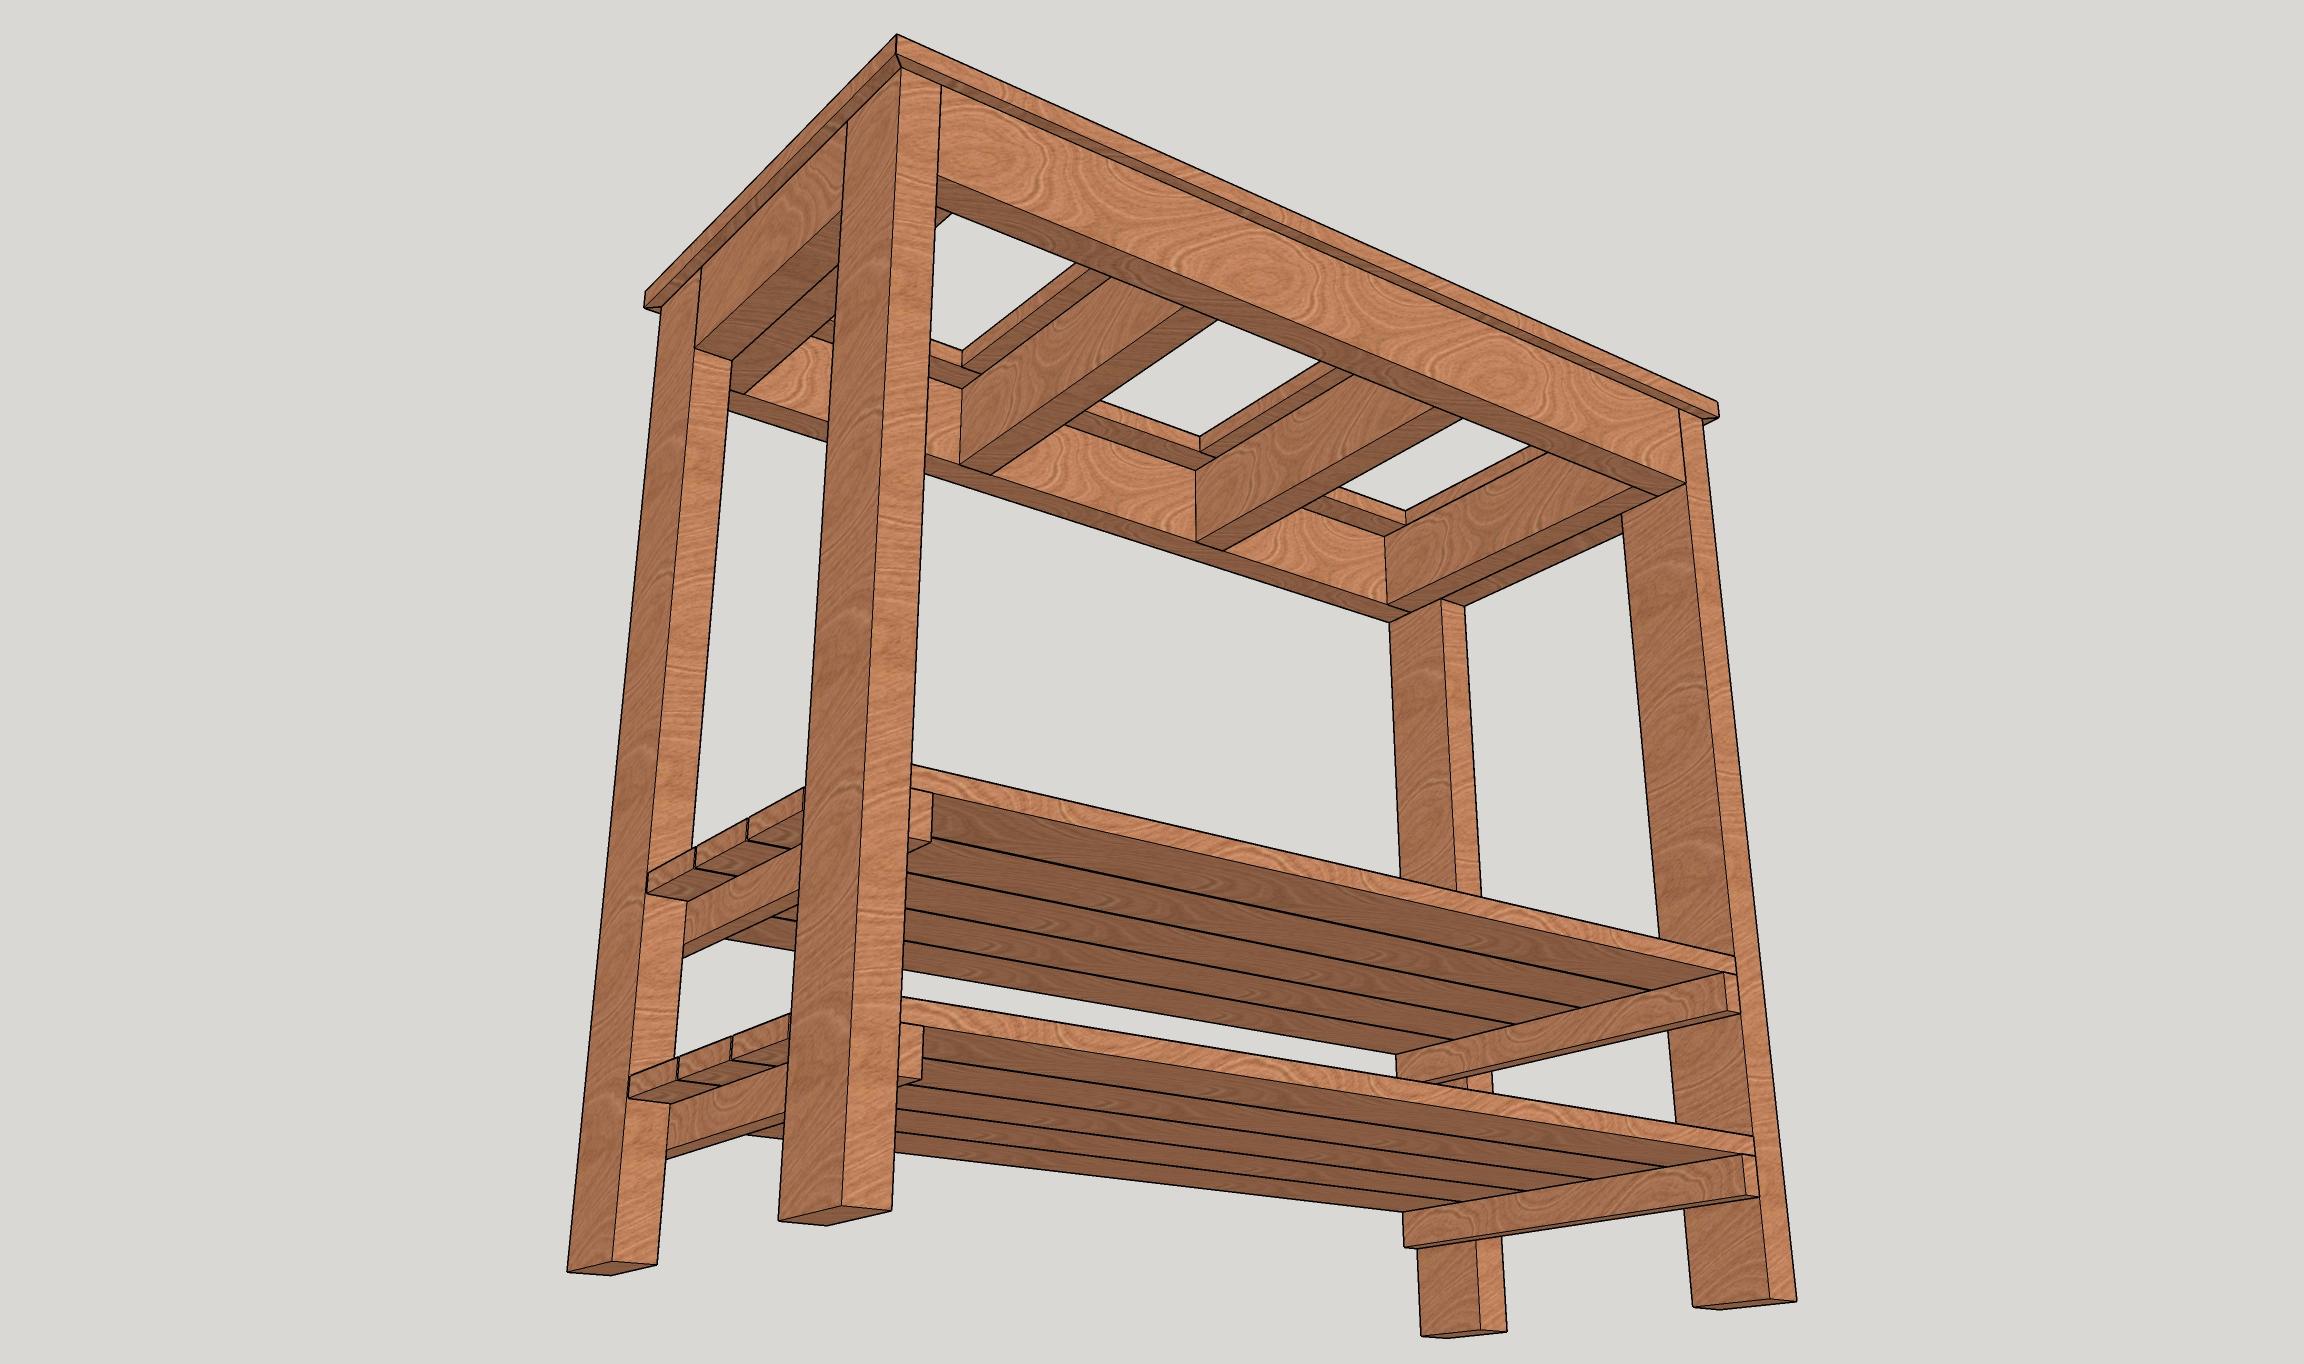
Second draft of aquarium stand with shelves, low view, designed in SketchUp
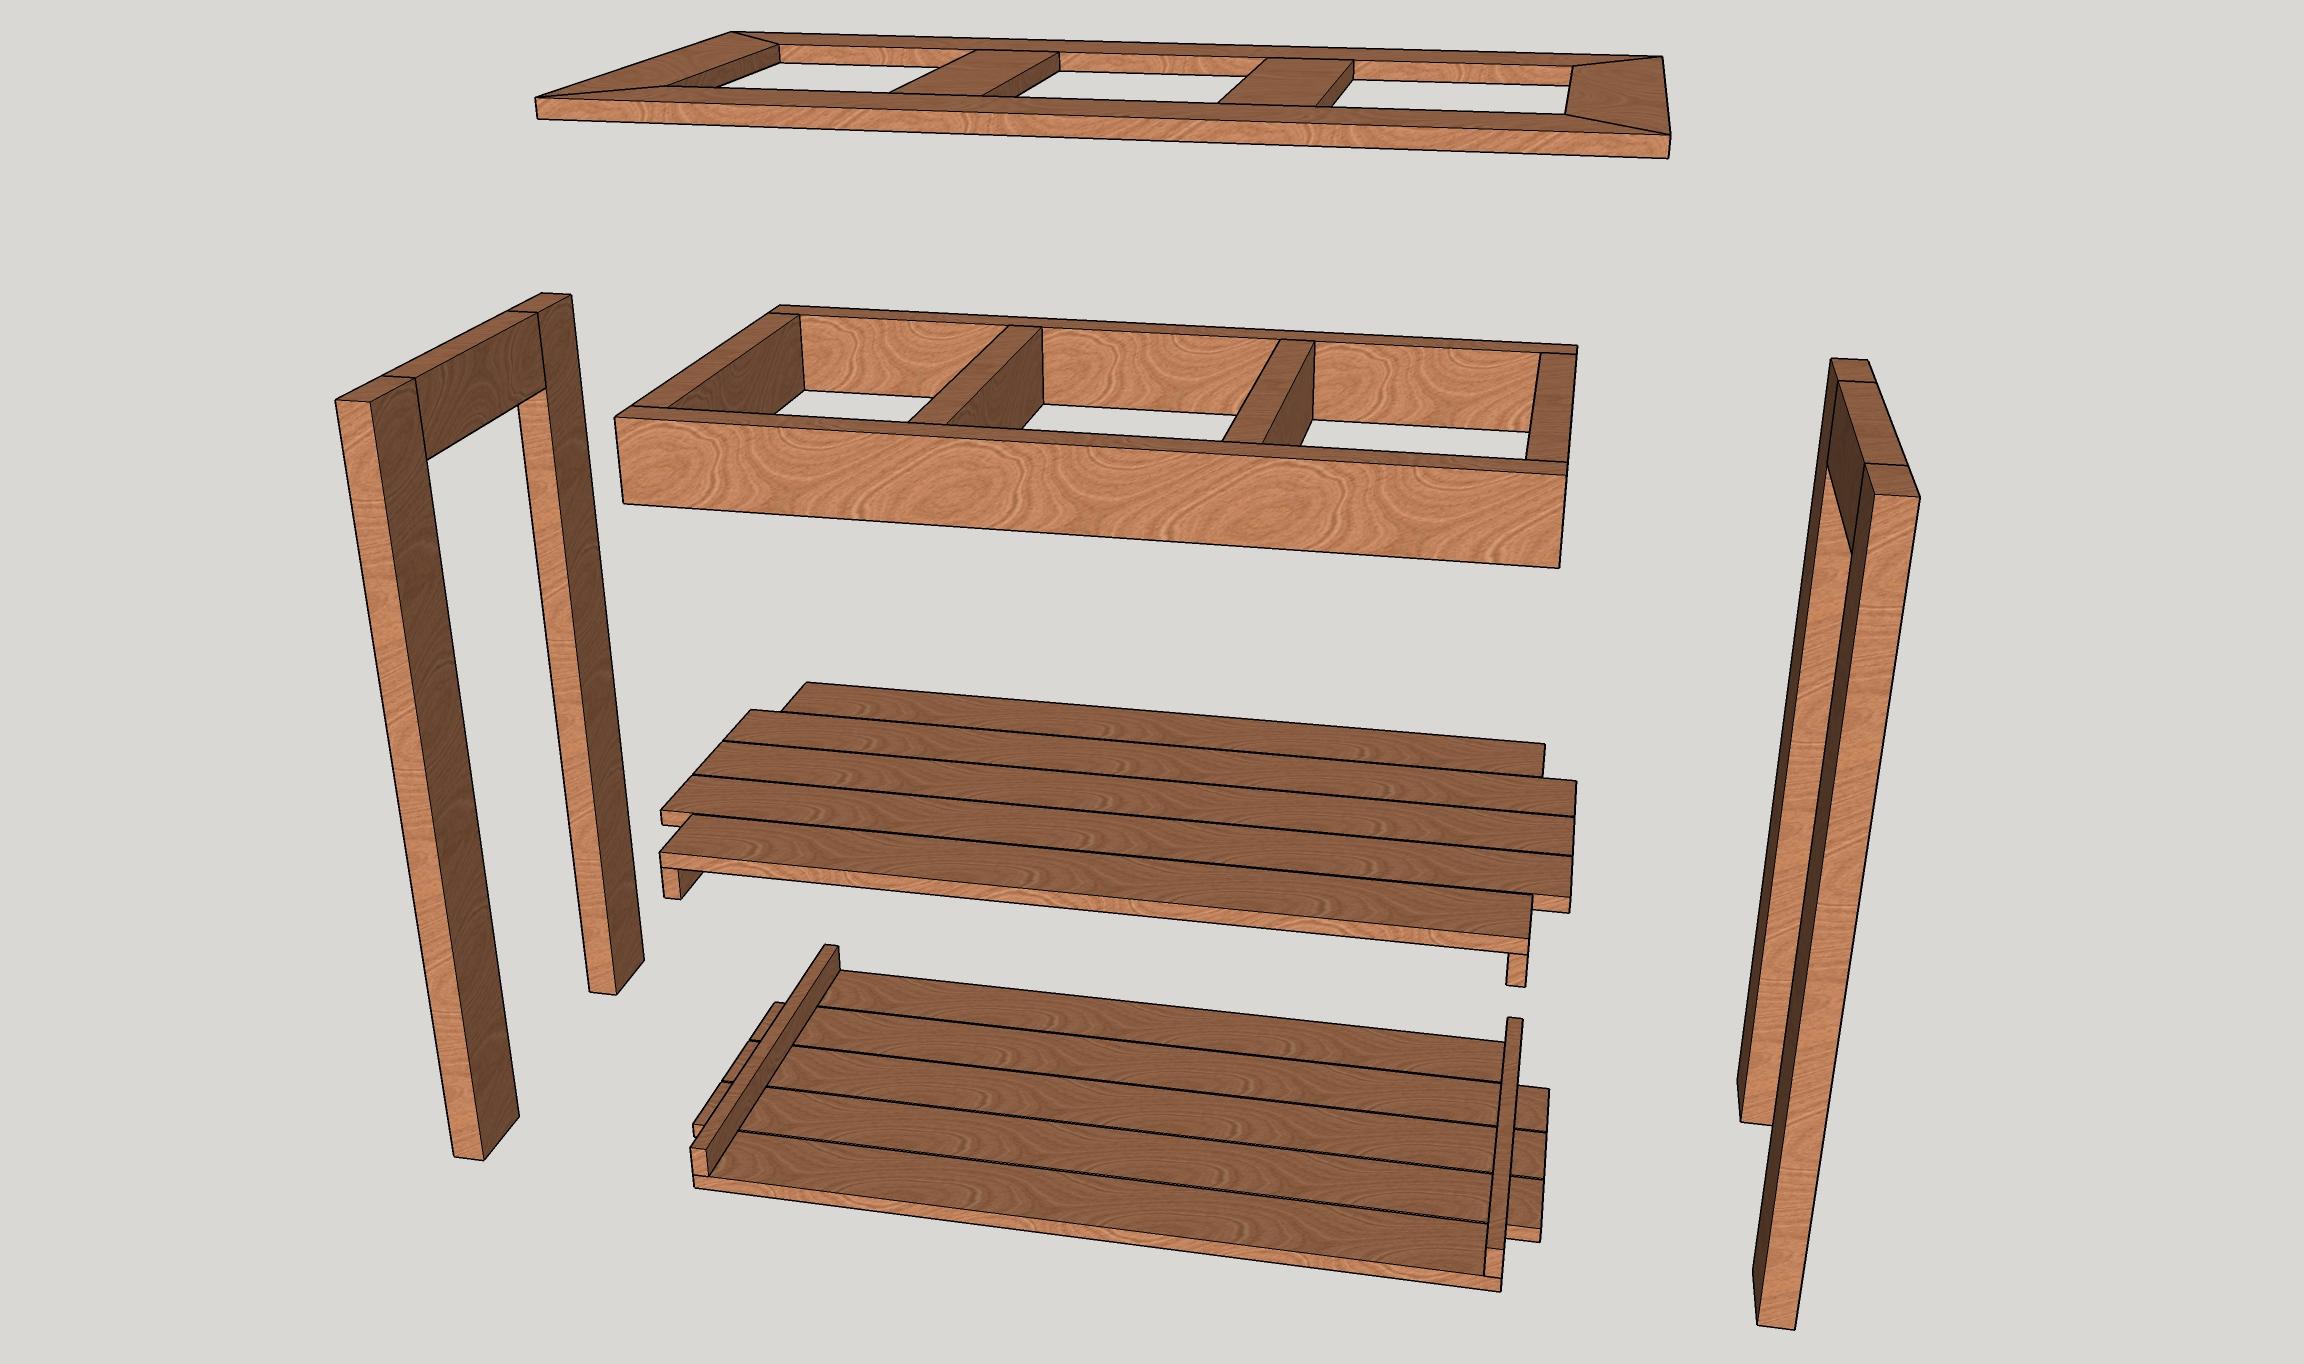
Second draft of aquarium stand with shelves, exploded, designed in SketchUp
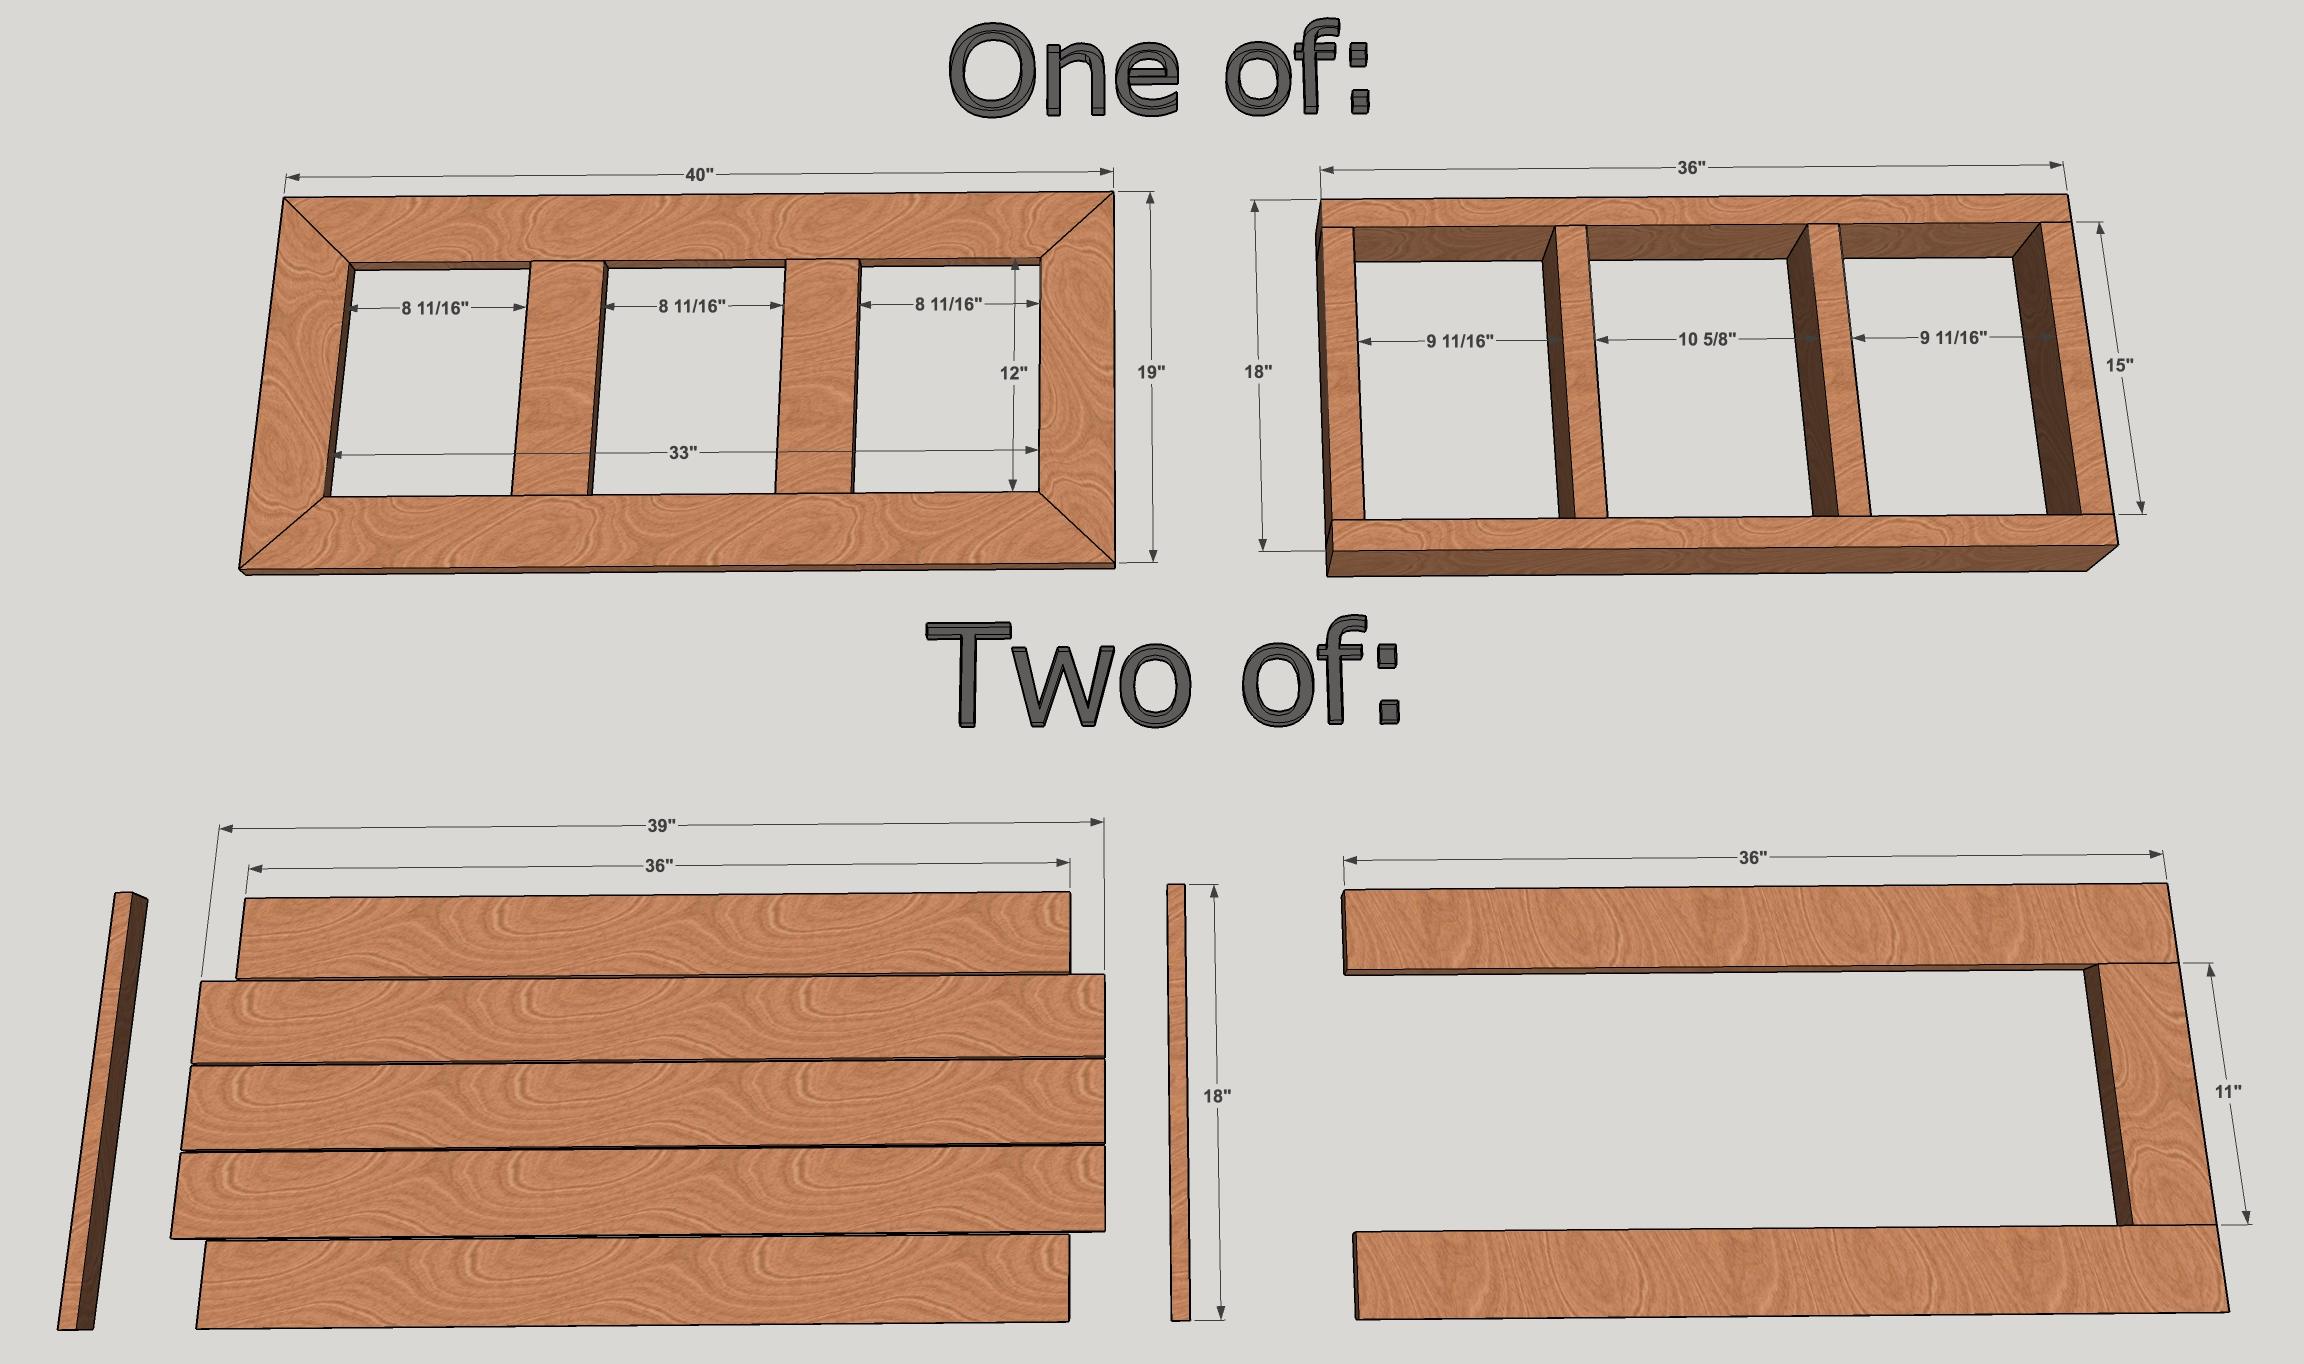
Second draft of aquarium stand with shelves, dimensions, designed in SketchUp
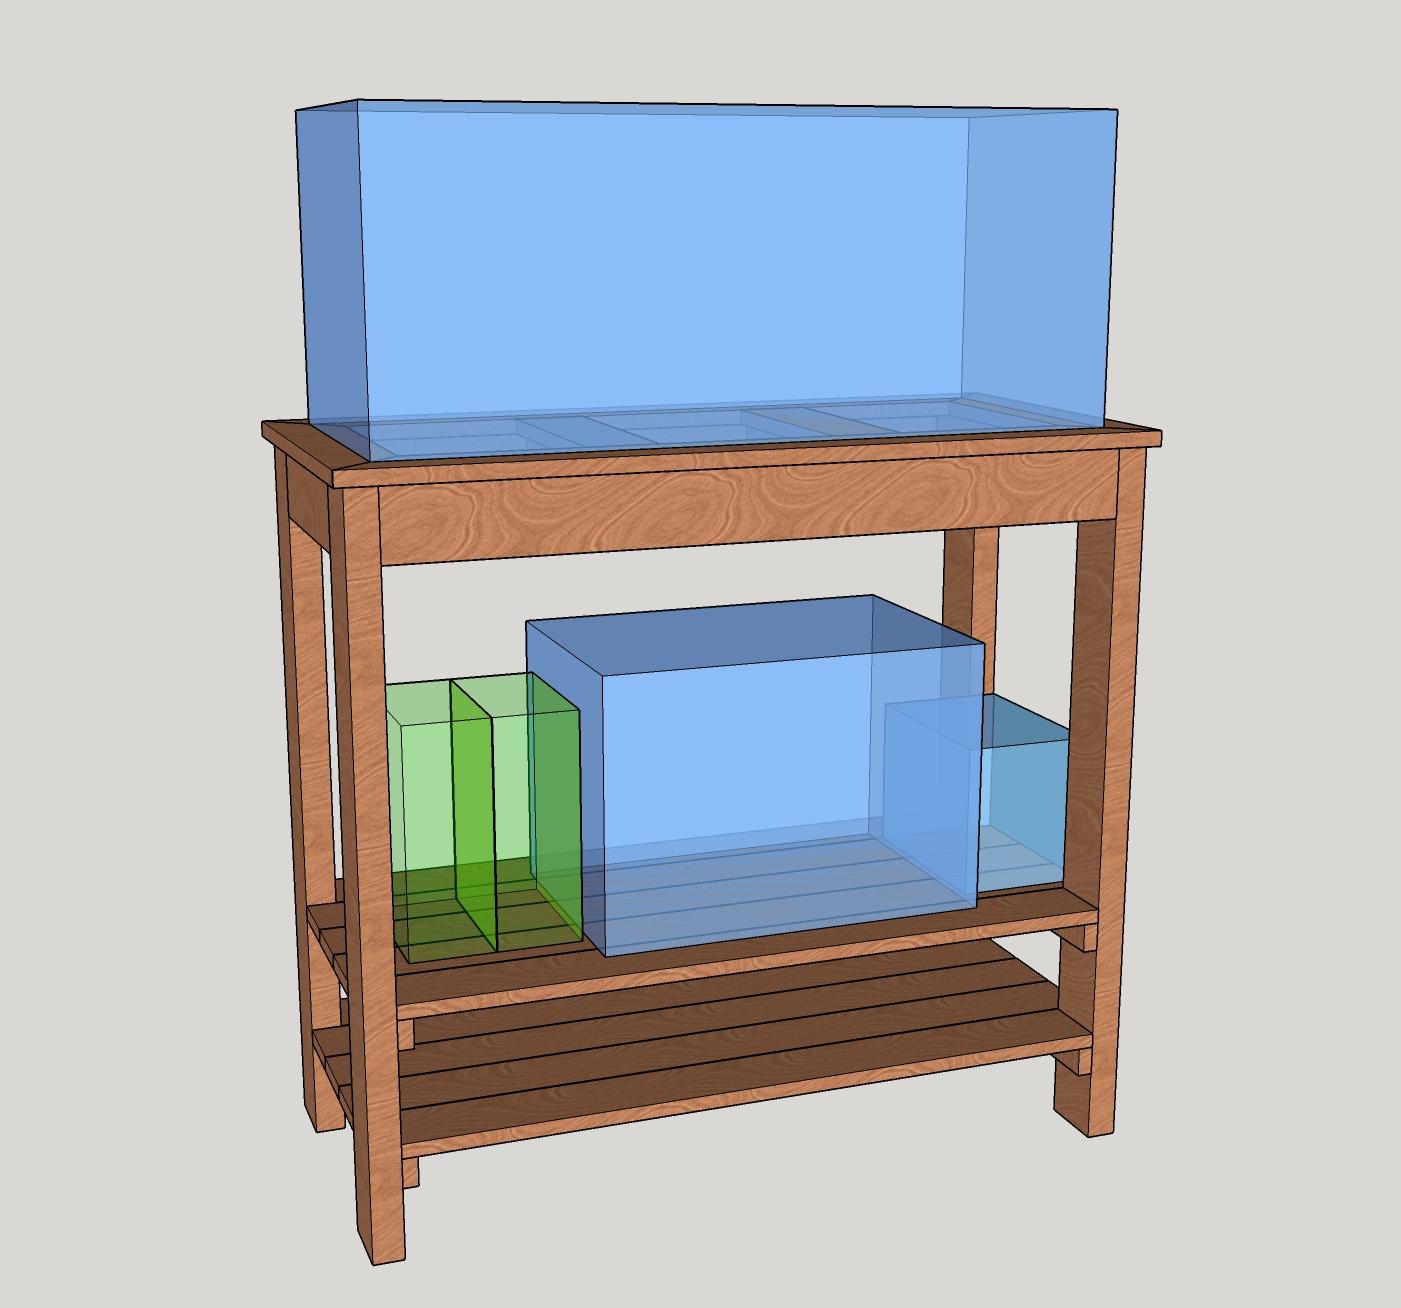
Second draft of aquarium stand with shelves showing the tanks I intend to keep on it, designed in SketchUp
Materials
I bought the lumber at Home Depot, though they only had the common type of 1x4 and not the somewhat sturdier douglas fir I hoped to use for the shelves. The rest I got on Amazon or had from previous projects.
- 6 1 in. x 4 in. x 8 ft. boards
- 4 2 in. x 4 in. x 8 ft. boards
- 1 1 in. x 2 in. x 8 ft. board
- 3M Sanding Sponge, Medium Grit: This didn’t sand as aggressively as I hoped, and I kept tearing it, so I ended up wrapping it with other sandpaper.
- 28 Pcs 120 to 3000 Grit Wet Dry Sandpaper 9x3.6 Inches: It only comes with two of each grit, and I only used the 100-300 range grits, so I would get a bigger pack of other sandpaper.
- 16 of GRK FTHS8212HP Trim Handy FIN 8 by 2-1/2-Inch Head Screws
- 8 of GRK R4 HandyPak Multipurpose Screws, 10 by 3-1/8-Inch
- Titebond III Ultimate Wood Glue, 8 Oz
- AmazonBasics Microfiber Cleaning Cloth - 36 Pack
- Minwax 61500 Pre Stain Wood Conditioner, 1 Quart
- Minwax 22718 1/2 Pint Wood Finish Interior Wood Stain, Ebony: I should have gotten the 1 quart version, as I barely had enough for a single coat.
- Rust-Oleum Varathane 200281 Interior Crystal Clear Polyurethane Water-Based Spray, Satin Finish: This was also barely enough, but I didn’t want a heavy sheen anyway. Consider the 1 quart version, though it is not a spray can, which might be better anyway.
- 8 of 1/2” wooden dowel pins
In case they are useful to anyone, here my SketchUp files: examples and measurements.

Not many places to store lumber in a studio apartment.
I used a 10 inch miter saw to make the following cuts. X/Y means a trapezoid with 45 degree miter cut ends such that one edge is X inches and the other is Y inches:
- 1x4 #1: 40/33 + 40/33 +19/12 = 92 inches
- 1x4 #2: 36 + 36 + 19/12 = 91 inches
- 1x4 #3: 36 + 36 + 12 = 84 inches
- 1x4 #4: 39 + 39 + 12 = 90 inches
- 1x4 #5: 39 + 39 = 78 inches
- 1x4 #6: 39 + 39 = 78 inches
- 2x4 #1: 36 + 36 + 15 = 87 inches
- 2x4 #2: 36 + 36 + 15 = 87 inches
- 2x4 #3: 36 + 36 + 15 = 87 inches
- 2x4 #4: 15 + 11 + 11 = 37 inches
- 1x2 #1: 18 + 18 + 18 + 18 = 72 inches
This yielded the following pieces of wood:
- 2 of 3.5 x 0.75 x 40/33
- 2 of 3.5 x 0.75 x 19/12
- 2 of 3.5 x 0.75 x 12
- 4 of 3.5 x 0.75 x 36
- 6 of 3.5 x 0.75 x 39
- 6 of 3.5 x 1.5 x 36 (4 are legs)
- 4 of 3.5 x 1.5 x 15
- 2 of 3.5 x 1.5 x 11
- 4 of 1.5 x 0.75 x 18

I set up a miter saw on Alan's balcony-roof to cut the wood for my table. I forgot safety glasses, so I squinted.

I set up a miter saw on Alan's balcony-roof to cut the wood for my table. I forgot safety glasses, so I squinted.
I sanded all the pieces to taste. I probably will use an orbital sander next time, as I got pretty tired and still didn’t do as thorough as a job as I would have liked. I did sand the edges of the 1x4s for the top surface a little too much such that the corners didn’t fit snugly together. I attribute this to starting with those pieces and having too much energy at that point!
Assembly
-
Use GRK Trim #8 by 2.5 inch screws to attach from the outside the 39 inch 2x4s to the 15 inch 2x4s to form the main underlying support. I used two screws at each joint (predrilling a small hole first, though this wasn’t totally necessary based on a single test). I drove the screws in a tad below the surface figuring I would fill the holes later, but I ended up just leaving them.

I was pleased my first miter cuts fit together well enough. I also used some thin GRK screws to secure the main supporting structure.
-
Use GRK Multipurpose #10 by 3.125 inch screws to attach from the outside the 36 inch 2x4 legs to the short sides of the frame. Use an 11 inch 2x4 as a spacer.
-
Use wood glue to attach the 11 inch 2x4s where they were used as spacers in the previous step, between the legs. Clamp as directed, at least 30 minutes. I left them for a few hours.

I glued one side piece in place, sort of as a test before I decided whether to glue the top on.

I glued one side piece in place, sort of as a test before I decided whether to glue the top on.
-
Assemble the two shelves using wood glue. I began with the outer, 36 inch 1x4s and clamped them to the 1x2 crossbar after gluing. Once those were cured, I added the middle three 39 inch 1x4s with glue. In lieu of clamping, I stacked the two shelves on top of the table and placed a heavy box and bucket of water on top overnight.

I put heavy things on the table while the glue was drying the planks to the crossbar.
-
Arrange the 1x4s for the top surface and make small adjustments till it’s as even as possible with the corners looking nice. Apply wood glue to the 1.5 inch surface of the main supporting frame and attach the 1x4s one at a time. I started with the 12 inch pieces, then the longer side pieces butted up against the 12 inch pieces, and lastly did the shorter sides. In lieu of clamping, I placed one of the shelves upside down on the top and stacked a heavy box and a bucket of water on top for a few hours.

I put heavy things on the table while the glue was drying the planks to the crossbar.
-
Drill some holes for the wooden dowels if you want adjustable shelves, otherwise you could simply screw them on with 1.5 inch screws later. I didn’t drill the holes till after finishing, though.


Finishing
I followed the directions in applying the Minwax Pre Stain Wood Conditioner and then the Minwax Wood Stain, using a rag instead of a brush. I should have used a smaller rag to waste less product, and I should have gotten the 1 quart version of stain. I had to stretch it and wring out the rag to salvage the last drops, and I still would have liked to go over some areas again. The directions said to leave it on for 5 to 15 minutes and then wipe it dry, but I found the stain was drying within minutes. Perhaps I needed to apply it much more thickly, but it was in short supply.
Check the weather if staining outside. It began pouring rain before I finished, so that also complicated things. I quickly relocated to the kitchen and continued working. I then let it dry overnight.

It started pouring rain while I was staining the table, so I had to rush everything into the kitchen and finish the job there.

I ran out of stain, but the table ended up looking OK. Perhaps I should have used a smaller rag in the application. I did manage to wring it out to get the last few boards covered.
The next day I took the table back outside and followed the directions on the can of Rust-Oleum Varathane Polyurethane Spray, Satin Finish. I chose satin since I wanted a subtle finish, but the can was also barely enough. Next time I will consider the 1 quart version, though it is not a spray can, which might be better anyway. I barely covered the outer surfaces with two or three thin coats.

In the process of spraying a polyurethane coating over the stained table
As mentioned, I drilled the holes for the shelf pegs after staining, but probably would do this before staining next time.
Results
The aquarium stand turned out pretty well. I don’t see a need to cover the screw holes, as they are pretty subtle on the front and back and look somewhat nice on the sides. There are a few slightly rough spots, particularly on one shelf that had a crappy piece of lumber, but it’s not bad.

Finished aquarium stand with two adjustable shelves

I used some new-to-me screws by GRK that have a sort of drill bit built into the tip, shaft and even under the head. This supposedly prevents wood splitting if you don’t drill a hole first and also allows the screw to burrow flush with the surface a bit better. I predrilled some holes anyway, and I was pleased enough with the look of the screws I opted not to cover them up.
Here are the final photos! Note the photos show 1/4 inch shelf pegs since my larger dowels hadn’t arrived yet and I was antsy to take photos to show my dad (which I still haven’t done several days later, but I will send him a link to this post shortly!).

Finished aquarium stand with two adjustable shelves

The finished aquarium stand with adjustable shelves. I designed and built it from scratch as my first foray into woodworking. Despite running out of stain, I am quite pleased with it!

Finished aquarium stand with two adjustable shelves

Finished aquarium stand with two adjustable shelves

Finished aquarium stand with two adjustable shelves

Finished aquarium stand with two adjustable shelves

Finished aquarium stand with two adjustable shelves